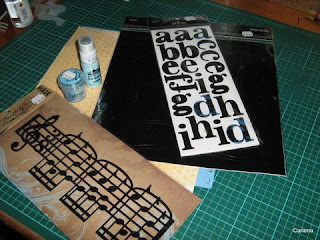
 Hi everyone! Today I am going to take you through a short journey with MASKS! Maybe you have used them, maybe not. I LOVE masks! Masks are made from a durable, flexible material that is tacky on the one side. It is basically the opposite of a stencil. You can use them with anything that adds color – paints, ink, spray – you name it. Today I am going to use my favorite paint in the world – Ranger’s Paint Dabbers.
 Of course I chose my paper first – I chose this stunning paper by Heidi Swapp, and I am also using one of the masks from her Mega Mask set – Brackets. I place it on my paper where I want it.
 I then used a wide flat brush and mixed my Denim ( a dark Blue) and Cloudy Blue ( light blue) paint to get the color I wanted. I did not want my page covered completely, but I wanted the pattern to be clearly defined, so I made sure that I paid a bit more detail close to the mask.
 When finished painting, remove the mask, and wash it. I found that washing it makes no difference to the tackiness – but I don’t wash them anymore when I use the paint dabbers – they dry so quickly, and it is just too much work! When I use distress ink or other inks, I wipe them immediately, but I think I can safely say you can leave it when you use the Ranger dabbers.
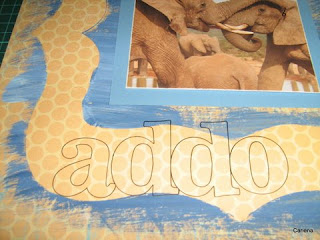
Next I added the letters from Heide Swapp’s Alphabet mask, spelling the title for my page. I am not going to use it as a MASK in the same manner, but as a STENCIL!! You can trace the words with a pencil, or, as I was going to paint them black, I used a black pen.

Here you can see what it looks like when I removed the mask. Now I am going to paint it with a thin paint brush to get the detail and my Black Paint dabber.

Here is a close up of the painting being done

And here my word is finished! I have to tell you – I was tempted to use the original mask as the title ( the masks are about the price of a sticker sheet of alphabets) but then I decided to go the proper route!!. You can, of course, use them as a sticker.

Next some embossing. I am using one of my favorite Tim Holtz flourishes, together with Distress Embossing Powder and the Distress Embossing Ink. The reason I am using these powders is because I like the distressed look for this page, with the painting being all distressed and a bit messy. I am using Black soot, Denim and Broken China – all spread over the stamped image.

Just a tip – remember to use your anti-static pad to make sure no stray powders land on your layout!

And this is the result of the embossing. I spread the colors on the image, so that you can get all of them onto the flourish.

And this is my finished layout. I just want to point out, that from a cost point of view, this layout cost me the piece of paper, the Cloudy Blue Dabber and Broken China Embossing powder( which was an indulgence – I did not have to do that to achieve my effects) and the photo. I had everything already in my stash – and it just goes to show – you CAN scrap and not spend a fortune!
My challenge to you this week would be to use either a mask (in any shape and size) or any form of embossing – dry, heat, wet – you name it, on your layout!! JUST CREATE and remember to use a STAMP!!!!
Tutorial by Cariena Basson


Wow, this is great! Think i will try a layout like this :-)
ReplyDeleteLove your tutorial.
ReplyDeleteThis is wonderful! THANK YOU!
ReplyDeleteFantastic tutorial! I love it! I don't think I have ever tried the masking before (and I own a Tim Holtz mask!!LOL
ReplyDelete~Lacey
love the LO and thanks for the tutorial!!!!
ReplyDeleteAwesome tutorial!
ReplyDeleteFantastic tutorial Cariena!! Very helpful. I think I need to get some of those Ranger inks!!
ReplyDeleteGreat tutorial....LOVE THIS PAGE!!!
ReplyDelete