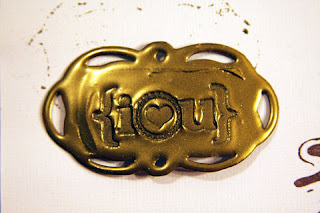
Hi everyone, Pamela here, coming at you with the technique for the month here at Scrap and Stamp: Debossing! Are you saying "What's that?" Well, I am glad you asked...let me walk you through it. :)
Start with a piece of paper a little bigger then whatever stamp you want to use. I chose to use a die cut that I cut with my Slice. Other supplies you need:
stamp
embossing powder
heat gun
Versamark pad, or some kind of embossing or craft pad
1. Ink your die cut/piece of paper with your embossing pad.
2. Make sure you have a scratch piece of paper behind your die cut, then pour embossing powder over the whole thing. You want to make sure the whole area is covered, so don't be afraid to pour a lot, you will not lose any--you can just pour it back in the container.
3. Lift your piece of paper up. It may be helpful to use a tool to slide under it. Then lightly tap excess powder off and set aside. If it doesn't look perfect, don't worry you won't be able to tell after adding several layers.
4. Pour your excess powder back into your container.
5. Using your heat gun, heat emboss your piece. I usually hold the heat gun about 2-3 inches away from what I am embossing. Smaller pieces of paper are harder to work with. I recommend when embossing it with your heat gun that you hold the gun directly above the cardstock, and not at an angle...this will keep it from moving all over the place while you are trying to heat it. You can also use a tool to hold it in place, but remember to not use your fingers, it gets very hot.
6. Let it cool for a minute and then start again. Using your embossing pad, cover your piece again.
7. Poor on your embossing powder.
8. Heat.
9. Repeat this process several more times. If you use Ultra Thick embossing powder, then it may not need as many layers. I just used regular embossing powder and I embossed 5 times. I usually emboss 5-6 times when doing this technique.
10. Immediately after your last emboss, while enamel is still hot, stamp your image in it.
There you have it! If it didn't turn out how you wanted...no worries, just add another layer of embossing powder and melt it all together and try again. :)
Here's the layout I created:
Can't wait to see how you use this technique on your layouts!
Subscribe to:
Post Comments (Atom)


That is so cool! (or rather soooo HOT). I'm making that my goal to try that this week. Thanks for the tutorial Pamela!
ReplyDeleteVery useful tutorial, Pamela!
ReplyDeletethis is really cool - can't wait to try it!!! thanks for the clear and easy to follow steps!
ReplyDeleteGreat tutorial Pam, love all the photos and specific directions. Looks like fun!
ReplyDeleteGreat job!! This was a fun techinque and your tutorial was very clear!! Great layout, too.
ReplyDelete