

Saturday, February 27, 2010
A texture challenge....
Thank you for joining us for another Scrap and Stamp Saturday! It is hard to believe that Saturday is hear already and another month is gone! Where does the time go! So what did you think of our first tutorial? Is this a feature you will enjoy in the future? Is there anything that you have always wanted to know how to do that you don't? Let us know and we will see what we can do for a future tutorial. We really want to know what you think!!
This weeks challenge is to use texture and at least one stamp on your layout! Now it can be any type of texture you like. Embossing, fabric, ribbon, paint, heck even spackling if you like...lol.
We have a wonderful sponsor this week, The Character Cafe. Be sure to check their store to see all of the gorgeous images that are for offer! You wont be sorry you did, well your wallet might...lol The winner will receive 3 digis of their choice!

Now check out what the design team did! Don't you just love 'em all!!! Stop by each of their blogs to find out a little bit about their pages and maybe a few closeups!


We hope you will join us this week. Please link us to your new layout by Friday, March 5th at 11pm EST! Happy Crafting!!
This weeks challenge is to use texture and at least one stamp on your layout! Now it can be any type of texture you like. Embossing, fabric, ribbon, paint, heck even spackling if you like...lol.
We have a wonderful sponsor this week, The Character Cafe. Be sure to check their store to see all of the gorgeous images that are for offer! You wont be sorry you did, well your wallet might...lol The winner will receive 3 digis of their choice!

Now check out what the design team did! Don't you just love 'em all!!! Stop by each of their blogs to find out a little bit about their pages and maybe a few closeups!
Isolde

Lacey

Pamela

We hope you will join us this week. Please link us to your new layout by Friday, March 5th at 11pm EST! Happy Crafting!!
Friday, February 26, 2010
The winner is....
Sorry it has taken me so long to get to the winner this week(Stamp and Create). It has been a crazy week here and if you have emailed me I promise I will be checking and responding to them this weekend!
The winner is Maxine! Congrats please email me your addy at scrapandstampsaturday@gmail.com and I will send it on to Lacey! Thank you everyone for joining us last week! You can see more of Maxine's work HERE!
Saturday, February 20, 2010
A hybrid challenge...
Thank you for joining us for another Scrap and Stamp challenge! This week we are exicted to let you in on a few of the plans we have had in the works here! We will now be sharing a tutorial with you once a month, and when we do it will go along with that weeks challenge.
This week Lacey Stephens has written our very first tutorial be sure to check the previous post to read all about it! Then you will be all set for this weeks challenge!!! Because this weeks challenge is to use some sort of digital element on your traditional paper layout. Don't forget the stamp, either digi or traditional!
Some of you meet Janette of Stamping Dragon Designs during our blog hop, well this week she is sponsoring us again! Be sure to stop by Stamping Dragon Designs to see all of her gorgeous digital kits and stamps! Love them! They really tempt me to go digi...but I am not ready to give up papers completely!!
 Someone will win a $10 gift certificate! You could really stock up on digi elements with that!
Check out what the design team did with the gorgeous Pasionately Paisley kit from Stamping Dragon Designs!


Adding Digital Elements to a traditional “Paper” layout Tutorial
Adding Digital Elements to a traditional “Paper” layout
Hi, my name is Lacey Stephens. I am so excited to share the very first Scrap and Stamp Challenge tutorial with you!!
With the surge of Digital in the world of scrapping, some of us “old-school” scrappers may have a hard time figuring out what to do with Digital elements. Since this challenge blog is about including “stamping” in your layouts, it requires STAMPS and therefore…a paper layout!
However, we have a wonderful sponsor this week that has provided the Design Team with a digital kit to play with. Since we wanted to start providing tutorials and scrapbooking tips with some of our challenges, we thought this would be a good time to start. So let’s get started…
There are many different ways to incorporate digital elements into a traditional paper layout. Here are a few suggestions:
~ Print digital paper and add them to a layout as scraps or photo mats
~ Print digital paper and punch out different shapes to add elements: circles, layered flower punches, die cut shapes, etc…
~ Print digital paper and cover chipboard accents such as shapes, flourishes, or letters for your title
~ Add a digital stamp: print digital image, color, than add to your layout.
~ Create a collage of digital elements, such as flowers, swirls, and buttons…print out on white cardstock, and add as your own custom designer paper.
Today I am going to focus on the basics…so my sample uses digital papers printed and added to a layout as a background.
Here is my sample…

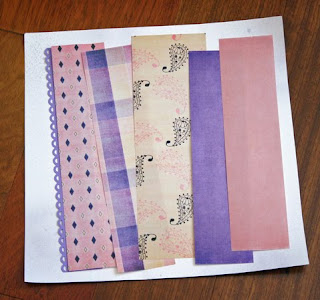
To get started, I printed out some of the digital papers from the kit onto to regular computer paper (you can also print out on cardstock if you prefer a heavier weight)….

If you don’t have a photo-editing software like Photoshop, you can easily insert the digital papers as an “image” into a word processing document, adjust the size you want, and print.
**Tip: Remember that digital elements are considered “pictures”, not documents. So you would insert them up into a photo-editing program or into a document as an “image”…in Microsoft Word, you would click “insert” – “Picture” – find the file – “insert” or “open”.**
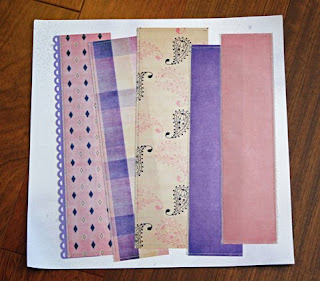
Once my papers were printed, I cut off the white margins. Then I cut them into different size strips (2 1/5” – 4” wide strips).
I randomly placed them on a 12x12 Cardstock for my base. Once I had the idea for placement, I punched a strip of purple cardstock with a border punch and added it to the paper on the left. Then I attached them to the cardstock with a little adhesive…
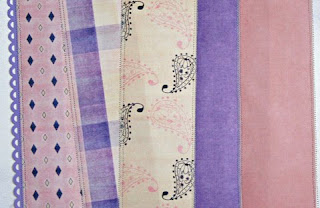
You can leave it as it is, but I wanted to add some sewing so I sewed a zig zag stitch along the vertical sides, and a straight stitch along the horizontal sides….
Here’s a close up of the stitched elements…
The kit came with some large “brads” and 2 digital stamps as well as papers and other elements. One of the great things with digital elements is that you can resize things. I copied 3 of each brad into a Word Document, sized them to 1” and printed them onto white cardstock. I also printed up a few different sizes of the digital stamps so I could get an idea of what size I wanted for my layout…
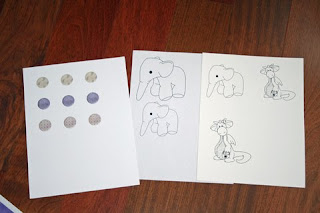
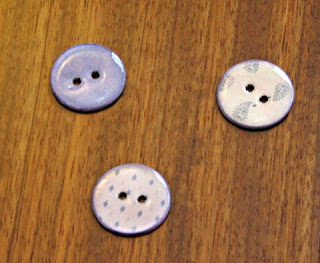
I knew I wanted to create chipboard buttons with the brad elements from the kit, so I punched out the brads with a 1” circle punch (which is why I resized them to 1”). I added those punches to chipboard circles and created my own chipboard buttons…that is a tutorial for a later date (*wink*)…
Once I had an idea of the size I wanted for the digital stamp, I resized it and printed it onto watercolor paper (you can choose any paper that you like for coloring)….
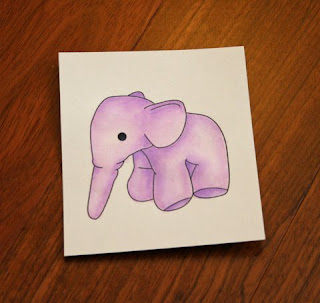
**Tip: Not all printers work well with watercolored images. If your image is “wet” after it prints, you can quickly add some clear or black embossing powder over the printed image and heat emboss with a heat gun. You can also try waiting for the ink to dry. I have an Espon printer that is noted for it’s “smudge-proof printing”, so I do not have any problems watercoloring a printed image.***
I added one more piece of printed digital paper to ground my pictures, my colored image, the title, some ribbon, flowers, charm, and handmade chipboard buttons…and my layout was complete…

I wanted to show you the same layout, but completely as a digital layout. The photos I used in the paper layout were from my “pre-digital camera” days and I forgot to scan them before adding them to my layout so I had to switch out the pictures.
Here is a completely digital layout…including the photos…
Although this digital layout only took me 15 minutes to complete, verses 5 hours for the paper layout (mainly for the handmade chipboard buttons, shimmerz spritzed title, and watercolored image), I am not ready to go 100% digital yet!! And that’s a good thing since this challenge blog is all about STAMPING on your layouts!!
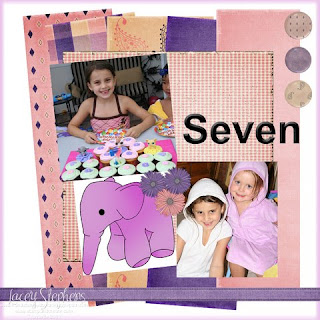
Before we go, I wanted to share the layout completed by fellow DT Pamela…

In this layout, Pamela used the pink gingham mat behind the photo…the purple scalloped circle (enlarged, printed, than cut out)…the swirls under the digital stamps (again, printed and cut out)…and both digital stamps. Fantastic layout, Pamela!!
I had fun creating this tutorial. I hope you find it helpful.
We would love to know what you think about this tutorial. If you have questions about this tutorial or suggestions for tutorials you would like to see, please leave us a comment!
Happy Scrapping!!
~Lacey Stephens
Hi, my name is Lacey Stephens. I am so excited to share the very first Scrap and Stamp Challenge tutorial with you!!
With the surge of Digital in the world of scrapping, some of us “old-school” scrappers may have a hard time figuring out what to do with Digital elements. Since this challenge blog is about including “stamping” in your layouts, it requires STAMPS and therefore…a paper layout!
However, we have a wonderful sponsor this week that has provided the Design Team with a digital kit to play with. Since we wanted to start providing tutorials and scrapbooking tips with some of our challenges, we thought this would be a good time to start. So let’s get started…
There are many different ways to incorporate digital elements into a traditional paper layout. Here are a few suggestions:
~ Print digital paper and add them to a layout as scraps or photo mats
~ Print digital paper and punch out different shapes to add elements: circles, layered flower punches, die cut shapes, etc…
~ Print digital paper and cover chipboard accents such as shapes, flourishes, or letters for your title
~ Add a digital stamp: print digital image, color, than add to your layout.
~ Create a collage of digital elements, such as flowers, swirls, and buttons…print out on white cardstock, and add as your own custom designer paper.
Today I am going to focus on the basics…so my sample uses digital papers printed and added to a layout as a background.
Here is my sample…

To get started, I printed out some of the digital papers from the kit onto to regular computer paper (you can also print out on cardstock if you prefer a heavier weight)….

If you don’t have a photo-editing software like Photoshop, you can easily insert the digital papers as an “image” into a word processing document, adjust the size you want, and print.
**Tip: Remember that digital elements are considered “pictures”, not documents. So you would insert them up into a photo-editing program or into a document as an “image”…in Microsoft Word, you would click “insert” – “Picture” – find the file – “insert” or “open”.**
Once my papers were printed, I cut off the white margins. Then I cut them into different size strips (2 1/5” – 4” wide strips).
I randomly placed them on a 12x12 Cardstock for my base. Once I had the idea for placement, I punched a strip of purple cardstock with a border punch and added it to the paper on the left. Then I attached them to the cardstock with a little adhesive…

You can leave it as it is, but I wanted to add some sewing so I sewed a zig zag stitch along the vertical sides, and a straight stitch along the horizontal sides….

Here’s a close up of the stitched elements…

The kit came with some large “brads” and 2 digital stamps as well as papers and other elements. One of the great things with digital elements is that you can resize things. I copied 3 of each brad into a Word Document, sized them to 1” and printed them onto white cardstock. I also printed up a few different sizes of the digital stamps so I could get an idea of what size I wanted for my layout…

I knew I wanted to create chipboard buttons with the brad elements from the kit, so I punched out the brads with a 1” circle punch (which is why I resized them to 1”). I added those punches to chipboard circles and created my own chipboard buttons…that is a tutorial for a later date (*wink*)…

Once I had an idea of the size I wanted for the digital stamp, I resized it and printed it onto watercolor paper (you can choose any paper that you like for coloring)….

**Tip: Not all printers work well with watercolored images. If your image is “wet” after it prints, you can quickly add some clear or black embossing powder over the printed image and heat emboss with a heat gun. You can also try waiting for the ink to dry. I have an Espon printer that is noted for it’s “smudge-proof printing”, so I do not have any problems watercoloring a printed image.***
I added one more piece of printed digital paper to ground my pictures, my colored image, the title, some ribbon, flowers, charm, and handmade chipboard buttons…and my layout was complete…

I wanted to show you the same layout, but completely as a digital layout. The photos I used in the paper layout were from my “pre-digital camera” days and I forgot to scan them before adding them to my layout so I had to switch out the pictures.
Here is a completely digital layout…including the photos…

Although this digital layout only took me 15 minutes to complete, verses 5 hours for the paper layout (mainly for the handmade chipboard buttons, shimmerz spritzed title, and watercolored image), I am not ready to go 100% digital yet!! And that’s a good thing since this challenge blog is all about STAMPING on your layouts!!
Before we go, I wanted to share the layout completed by fellow DT Pamela…

In this layout, Pamela used the pink gingham mat behind the photo…the purple scalloped circle (enlarged, printed, than cut out)…the swirls under the digital stamps (again, printed and cut out)…and both digital stamps. Fantastic layout, Pamela!!
I had fun creating this tutorial. I hope you find it helpful.
We would love to know what you think about this tutorial. If you have questions about this tutorial or suggestions for tutorials you would like to see, please leave us a comment!
Happy Scrapping!!
~Lacey Stephens
Friday, February 19, 2010
The winner is....

Laurie Marmon! Congrats!!! Please email me at scrapandstampsaturday@gmail.com and I will let you know how to claim your Whimsy prize! You can see more of Laurie's beautiful work HERE!
Thank you to everyone who joined us for our inspiration challenge!
Saturday, February 13, 2010
A Sketchy Challenge.....
Thank you again for making our first ever blog hop a sucess! We loved meeting and greeting you all. And we love that we made a few new friends along the way! Be sure to check out the winners post to see if it was you!!
This week the wonderful Lacey of Stamp and Create is sponsoring us again! If you haven't been by the Stamp and Create site be sure to stop by! Lacey has some great prices. She is also the co-owner of the Wags 'n Whiskers stamps! Super cute I tell ya!!! They are having a release party this weekend so be sure to stop by to see the new addtitions!
This week the wonderful Lacey of Stamp and Create is sponsoring us again! If you haven't been by the Stamp and Create site be sure to stop by! Lacey has some great prices. She is also the co-owner of the Wags 'n Whiskers stamps! Super cute I tell ya!!! They are having a release party this weekend so be sure to stop by to see the new addtitions!

Here is what Lacey has to say about her store.....
I was a stay-at-home mom for 7 years so stamping was a great way for some “Mommy time”. But after stamping for over 2 years, my hobby became my obsession…so my obsession became my dream! Now I own an on-line store!
Stamp and Create is a new on-line store carrying many popular brands of stamps, paper, and embellishments including: Wags ‘n Whiskers Rubber Stamps, High Hopes Stamps, Kraftin’ Kimmie Stamps, Whiff of Joy, Stampavie, Penny Black, The Greeting Farm, Basic Grey, 7 Gypsies, Shimmerz, Nestabilities (always 20% off!!), charms and more!! I am always adding new items to the store…so check it out at www.stampandcreate.com
On February 12th, Wags 'n Whiskers is having a Blog Hop and Release. In addition to releasing 8 new images from our Illustrator Crissy Armstrong, we will be releasing 5 images from our new artist...new to the stamping world! Come join the fun!
Look at what you could win this week!!

This week we have a sketch from PageMaps for you to use! I love Becky's sketches!! It doesn't have to be exact of course as long as we can loosely see the sketch in your layout. Remember use at least one stamp!!

Now it is time to see what the design team came up with! We even got to play with some of the new release stamps from Wags 'n Whiskers if we wanted!


We hope you will play along with us this week! Be sure to link up your new layout by Friday, Feb. 26th at 11pm EST to be in for the drawing! Happy Crafting!!!!
Subscribe to:
Posts (Atom)

